If you are going to try to drill a well using PVC, please read this page carefully and hopefully you can avoid some of the stupid problems I experienced when I first started. My mistakes were the result of not thinking and/or not using common sense so you might avoid them anyway, but humor me and read this page anyway. OK?
To quote Yogi Berra, “Before I start talking, let me say this:”
This technique produces shallow wells, i.e. wells where the distance to the water is 25 feet or less. The wells may be deeper but the distance to the water table is 25 feet or less. That is the maximum depth a water well can be pumped with a suction pump. You don’t have to dig way down to an aquifer for an irrigation well. You just have to drill down under the standing water level. These shallow water wells are good for irrigation. They may or may not be safe to drink from. Some are, but please don’t drink the water out of a shallow well or use it for livestock feeding without first getting the water tested. The reason deep wells generally produce safe water is the soil has filtered it. Shallow wells obviously have less of this natural filtering. Also, please be sure and check your local statutes on the impressibility of well drilling.
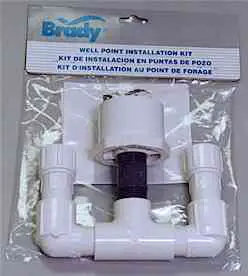
I became interested in drilling my own water well when I happened upon a “Brady T Pack” or “Well Point Installation Kit” in Home Depot. It is a fitting with connections for two hoses and a piece of two inch PVC. Here is their photograph of the Well Point Installation Kit.
Brady’s instructions included this diagram of how the drilling or washing process works. As you can see, water from two hoses is pumped down through a piece of two inch pipe (PVC) where it washes cuttings from the bottom of the whole up to the top. The cuttings come up to the surface on the outside of the pipe.
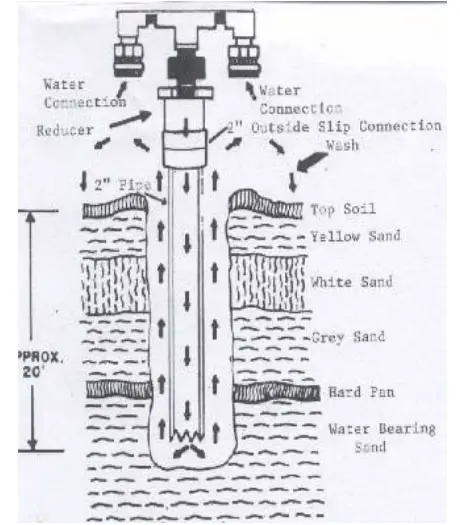
Don’t get too caught up in the layers of sand, soil, and hard pan shown on the Brady instructions. These are just examples and are almost guaranteed not to match what you have in your area.
Using their kit is a good place to start. The only place I can currently find it is from from Amazon at http://www.amazon.com/Well-Point-Installation-Kit-BTA-200/dp/B000H5W9SY/ref=pd_cp_hi_1
I think Brady was sold to another company who no longer offers them. That is no big deal because a homemade one is much better. I prefer a “drillhead” made from PVC parts that is very similar to the Brady Installation kit. It has a small weep hole in it so air can escape from the top. Otherwise trapped air can build up pressure and blow the drillhead off. Here is a picture of what I’m talking about:
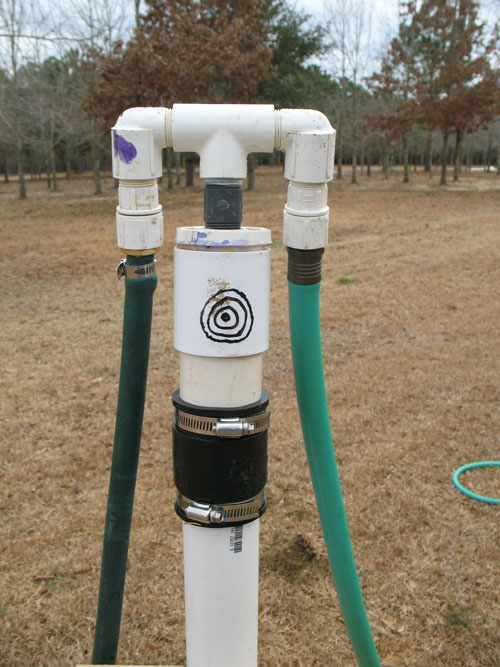
DRILL HEAD (my first one)
Do NOT copy this design! I made it by copying the Brady Well Kit not realizing it had a serious design flaw. Two 3/4 inch pipes leading into one 3/4 inch pipe restricts flow. The two 3/4 inch pipes should flow into a larger pipe! To make your own, use the instructions on the page, “Making the Drillhead.”
According to the instructions from Brady, the PVC is to be rotated back and forth using Channel Locks and is slowly worked into the ground while the water washes the cuttings back up to the top.
The object is to drill down to water bearing sand where a wellpoint is installed by putting it down through the two inch PVC and then raising the two inch PVC sufficiently to expose or leave the wellpoint in the water bearing sand at the bottom of the hole. Ideally, you want to pull the two inch PVC completely out of the ground.
I bought the Brady Wellpoint Installation kit and it worked quite well down to about 15 to 20 feet. My problem was the water table where I lived at the time was at 17 feet. I needed to go deeper. The top of the wellscreen must be placed way under the water table.
The Channel Locks were not sufficient for holding the PVC. They kept slipping and did not provide a secure handle or enough leverage. I made a handle that clamped on to the PVC. Here it is. It works well, although the pipe clamps wear out and must be replaced periodically.
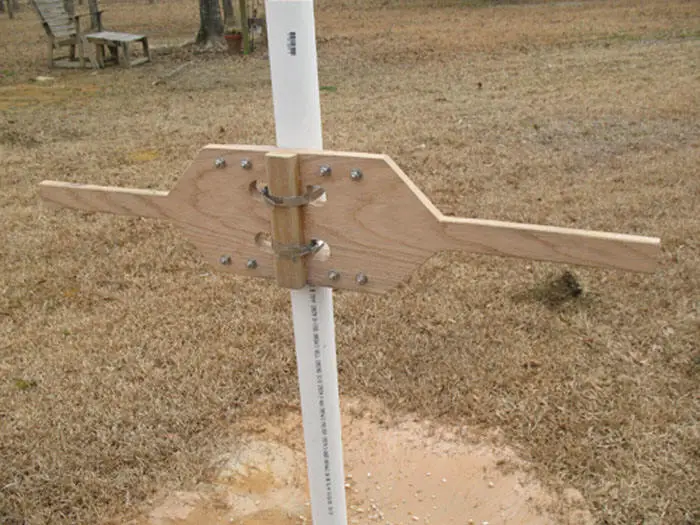
HOMEMADE HANDLE FOR PVC PIPE
The handle helped a lot. It was much easier to control the PVC and I was able to put more force into the drilling motion. I got down to 25 feet! Then I got stuck. My problem, it turned out, was simply a lack of patience. Interestingly, the weak link in drilling a well using PVC for both a drill stem and a drill bit is not the weak (human) drilling motor, the relatively weak drill stem or the plastic “drill bit.” It is the lack of sufficient water flow. I had two household hoses connected to the Brady kit but I could have easily used the water from ten more. Because I was drilling faster than the water was washing the cuttings to the surface, I got stuck. This technique requires more patience than I initially realized.
By now I had a 17 foot hole and a 25 foot hole in my back yard. I diligently filled in both holes and packed them as best I could.
By, the way, this whole story takes place over the course of a couple of months.
Then I started the third hole, close to the second hole. I was doing fine, and for once, being patient and going slow. I didn’t advance the PVC down into the hole until I had worked the pipe up and down leaning it from side to side thoroughly. After I made sure the pipe was good and loose I advanced it a few inches and worked it some more.
Everything was going quite well to about 20 feet down and then suddenly, I lost water flow. The water was no longer coming up around my PVC drillpipe. Then the pipe started becoming harder to move and by four or five minutes later the pipe froze up in the ground and I couldn’t move it. I couldn’t budge it no matter how hard I tried. Then I noticed water next to me. I had drilled into the second hole and the water I was putting into the third hole was coming back up through the second hole!! And I had packed, or at least I thought I had packed the second hole quite well when I filled it in. Well, crap. Well drilling was more complicated than I thought.
I filled in the third hole and filled in the second hole, again.
Fourth hole: By now, I had spent quite a bit of time reading about wells on the Internet. I had read up on gravel packs. Gravel packs are frequently installed at the bottom of wells to improve their efficiency. Pea gravel is put at the bottom of the well with the well screen essentially to enlarge the effective circumference of the well screen. If a four inch hole has been drilled and a two inch well screen is put in it, there is a gap between the side of the hole and the well screen. It will fill in with sand if left alone but if you fill it in with pea gravel then the well will produce more water. I didn’t understand how to install one (obviously as you’ll see in a minute) but I liked the idea of an increase in efficiency so I wanted it. So, back to drilling the fourth hole. By now I had screwed up enough holes to be able to drill one properly and I got a three inch hole down 33 feet. I then raised the PVC pipe a couple of feet and poured a couple feet of gravel down in the bottom of the hole. Next I tried to put a two inch well screen in the gravel. I didn’t understand it at the time but if I had used a 1 1/4 inch well screen it might have worked. A two inch screen was too big to push through the gravel in a hole made by a three inch pipe…
This story had a happy ending though. The two feet of pea gravel down at the bottom of the 33 foot hole actually made a decent well screen and the well produced about three gallons a minute. Not as much as if I had installed the well screen properly but it worked and I watered my yard for a couple of years with it. I even put in a sprinkler system that ran off the well. But, I didn’t understand all that at the time…
I thought my problem with the poor production was I wasn’t deep enough. I bought a mud pump and built a re-circulating water system. It worked extremely well. On the next well I got down to 60 feet and the pipe got stuck. I figured that was plenty deep enough. The water table at that location was at about 15 feet so I figured at 60 feet I couldn’t go wrong. I hooked a pump up to it and it worked great, for about 20 seconds. If I let the well rest about five minutes it would pump great again – for about 20 seconds. I failed to appreciate the importance of the well screen. What was happening was I was pumping out all the water in the pipe and then I had to wait on water to flow back in through the little two inch hole in the bottom. If I had put a well screen down there, I could have pumped water for days.
Thanks for reading all this. Maybe you already understood these things. Maybe you are smart enough to figure them out as you go. On the other hand, if you uneducated about wells like I was, then you just saved quite a bit of trial and error and grief.
Remember these things when using this method:
- 1. The technique described in these web pages is limited to drilling a two inch or three inch hole about 25 to 30 feet. The limitation results from the lack of limited water flow and the problem of the walls of the hole caving in on the drillpipe. Add bentonite mix to your water flow and you will probably add 10 feet to the well. With the “head start” method you can add 10 feet. Add a good mud pump to the equation and it is possible to go significantly deeper.
- 2. If you are using water from two hoses to wash the cuttings to the surface it will work just fine BUT, you have to go very, very slow – especially when you get past about 20 feet deep. If you fail to do this, you will get the pipe stuck every time.
- 3. There are no breaks allowed in the process once you start drilling – at least none where the water stops flowing. If nightfall forces you to stop for the day and you can’t leave the water running all night, pull the drill pipe out of the ground and start anew the next day. When you start back, it will not go in as far as you had it the night before but you will progress quickly back to where you left off.
- 4. When drilling and it comes time to add a section of PVC, make sure you have worked the pipe good and loose before you proceed. Only after the pipe is extremely loose in the hole should you add another length of PVC pipe. You will need a few minutes for the PVC glue to set up and you can’t afford for the hole to close in on your pipe while the glue cures.
- 5. Always, always, ALWAYS use PVC primer before gluing.
- 6. Always, always, always use a well screen. Drill 15 or 20 feet deeper than the water table (if you can) and when you have worked the drill pipe until it is good and loose, take the water fitting off the top, quickly put well screen connected to a smaller pipe down through the drill pipe. When you feel the well screen hit bottom, raise the drill pipe and take it out of the ground, leaving only the well screen pipe.
- 7. It is rare for shallow water wells to produce potable (safe to drink) water. Shallow wells are primarily for irrigation. Get the water tested before drinking it.
Hmmm…. Seems simple looking back on it…